Spring notes
Spring Bean Life Cycle Callback Methods
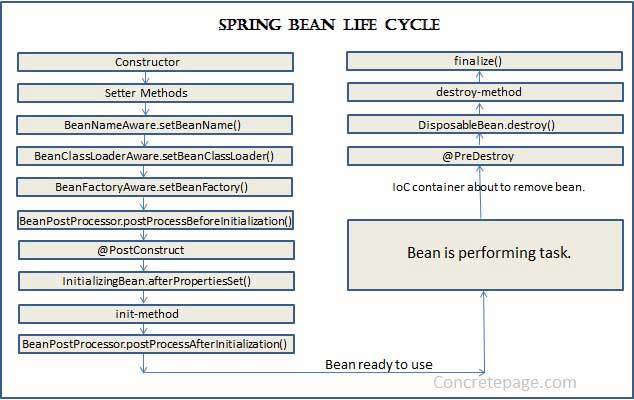 A bean life cycle includes the following steps.
- Within IoC container, a spring bean is created using class constructor.
- Now the dependency injection is performed using setter method.
- Once the dependency injection is completed, BeanNameAware.setBeanName() is called. It sets the name of bean in the bean factory that created this bean.
- Now < code>BeanClassLoaderAware.setBeanClassLoader() is called that supplies the bean class loader to a bean instance.
- Now < code>BeanFactoryAware.setBeanFactory() is called that provides the owning factory to a bean instance.
- Now the IoC container calls BeanPostProcessor.postProcessBeforeInitialization on the bean. Using this method a wrapper can be applied on original bean.
- Now the method annotated with @PostConstruct is called.
- After @PostConstruct, the method InitializingBean.afterPropertiesSet() is called.
- Now the method specified by init-method attribute of bean in XML configuration is called.
- And then BeanPostProcessor.postProcessAfterInitialization() is called. It can also be used to apply wrapper on original bean.
- Now the bean instance is ready to be used. Perform the task using the bean.
- Now when the ApplicationContext shuts down such as by using registerShutdownHook() then the method annotated with @PreDestroy is called.
- After that DisposableBean.destroy() method is called on the bean.
- Now the method specified by destroy-method attribute of bean in XML configuration is called.
- Before garbage collection, finalize() method of Object is called.
Spring framework provides following 4 ways for controlling life cycle events of bean:
- InitializingBean and DisposableBean callback interfaces
- Other Aware interfaces for specific behavior
- Custom init() and destroy() methods in bean configuration file
- @PostConstruct and @PreDestroy annotations
InitializingBean
The org.springframework.beans.factory.InitializingBean interface specifies a single method −
void afterPropertiesSet() throws Exception;
Destruction callbacks
The org.springframework.beans.factory.DisposableBean interface specifies a single method −
void destroy() throws Exception;
Custom init() and destroy() methods in bean configuration file
The default init and destroy methods in bean configuration file can be defined in two ways:
Bean local definition applicable to a single bean Global definition applicable to all beans defined in beans context
Local definition is given as below.
<beans>

	<bean id="demoBean" class="com.howtodoinjava.task.DemoBean"
					init-method="customInit"
					destroy-method="customDestroy"></bean>

</beans>
Where as global definition is given as below. These methods will be invoked for all bean definitions given under
<beans default-init-method="customInit" default-destroy-method="customDestroy">

    	<bean id="demoBean" class="com.howtodoinjava.task.DemoBean"></bean>

</beans>
@PostConstruct and @PreDestroy annotations
Spring 2.5 onwards, you can use annotations also for specifying life cycle methods using @PostConstruct and @PreDestroy annotations.
@PostConstruct annotated method will be invoked after the bean has been constructed using default constructor and just before it’s instance is returned to requesting object. @PreDestroy annotated method is called just before the bean is about be destroyed inside bean container. A sample implementation will look like this:
package com.howtodoinjava.task;

import javax.annotation.PostConstruct;
import javax.annotation.PreDestroy;

public class DemoBean
{
	@PostConstruct
	public void customInit()
	{
		System.out.println("Method customInit() invoked...");
	}

	@PreDestroy
	public void customDestroy()
	{
		System.out.println("Method customDestroy() invoked...");
	}
}
Spring Notes
AOP
 execution(* concert.Performance.perform())  and !bean('woodstock')
 @Aspect
public class Audience {
  @Before("execution(** concert.Performance.perform(..))")
  public void silenceCellPhones() {
Before performance
-
Fortunately, there’s a way: the @Pointcut annotation defines a reusable pointcut within an @AspectJ aspect. The next listing shows the Audience aspect, updated to use @Pointcut.
- Reuse pointuct
@Aspect public class Audience { @Pointcut("execution(** concert.Performance.perform(..))") public void performance() {} //Define named pointcut @Before("performance()") public void silenceCellPhones() { System.out.println("Silencing cell phones"); @Before("performance()") public void takeSeats() { System.out.println("Taking seats"); } - The body of the performance() method is irrelevant and, in fact, should be empty. The method itself is just a marker, giving the @Pointcut annotation something to attach itself to.
import org.aspectj.lang.ProceedingJoinPoint; public class Audience {
public void watchPerformance(ProceedingJoinPoint jp) { try {

System.out.println("Silencing cell phones"); System.out.println("Taking seats");
<aop:config>
<aop:aspect ref="audience">
<aop:pointcut
id="performance"
expression="execution(** concert.Performance.perform(..))" />
<aop:around     Declare around advice

pointcut-ref="performance" method="watchPerformance"/> </aop:aspect>
</aop:config>
-
to use AspectJ’s @DeclareParents annota¬tion to magically introduce a new method into an advised bean. But AOP introduc¬tions aren’t exclusive to AspectJ. Using the
- Listing 1.7 Spring offers Java-based configuration as an alternative to XML.
package com.springinaction.knights.config; import org.springframework.context.annotation.Bean; import org.springframework.context.annotation.Configuration; import com.springinaction.knights.BraveKnight; import com.springinaction.knights.Knight; import com.springinaction.knights.Quest; import com.springinaction.knights.SlayDragonQuest; @Configuration public class KnightConfig { @Bean public Knight knight() { return new BraveKnight(quest()); } @Bean public Quest quest() { return new SlayDragonQuest(System.out); } } -
In a Spring application, an application context loads bean definitions and wires them together. The Spring application context is fully responsible for the creation of and wiring of the objects that make up the application. Spring comes with several imple¬mentations of its application context, each primarily differing only in how it loads its configuration.
-
When the beans in knights.xml are declared in an XML file, an appropriate choice for application context might be ClassPathXmlApplicationContext.1
-
These system services are commonly referred to as cross-cut¬ting concerns because they tend to cut across multiple components in a system.
-
Your components are littered with code that isn’t aligned with their core func¬tionality. A method that adds an entry to an address book should only be con¬cerned with how to add the address and not with whether it’s secure or transactional.
- Spring seeks to eliminate boilerplate code by encapsulating it in templates. Spring’s JdbcTemplate makes it possible to perform database operations without all the ceremony required by traditional JDBC. The container is at the core of the Spring Framework. Spring’s container uses DI to manage the components that make up an application. This includes creating associa¬tions between collaborating components. As such, these objects are cleaner and easier to understand, they support reuse, and they’re easy to unit test.
- There’s no single Spring container. Spring comes with several container imple¬mentations that can be categorized into two distinct types. Bean factories (defined by the org.springframework.beans.factory.BeanFactory interface) are the simplest of containers, providing basic support for DI. Application contexts (defined by the org.springframework.context.ApplicationContext interface) build on the notion of a bean factory by providing application-framework services, such as the ability to resolve textual messages from a properties file and the ability to publish application events to interested event listeners.
-
Although it’s possible to work with Spring using either bean factories or applica¬tion contexts, bean factories are often too low-level for most applications. Therefore, application contexts are preferred over bean factories. We’ll focus on working with application contexts and not spend any more time talking about bean factories.
-
As you can see, a bean factory performs several setup steps before a bean is ready to use. Let’s break down figure 1.5 in more detail: 1 Spring instantiates the bean. 2 Spring injects values and bean references into the bean’s properties. 3 If the bean implements BeanNameAware, Spring passes the bean’s ID to the set-BeanName() method. 4 If the bean implements BeanFactoryAware, Spring calls the setBeanFactory() method, passing in the bean factory itself. 5 If the bean implements ApplicationContextAware, Spring calls the set-ApplicationContext() method, passing in a reference to the enclosing appli¬cation context. 6 If the bean implements the BeanPostProcessor interface, Spring calls its post- ProcessBeforeInitialization() method. 7 If the bean implements the InitializingBean interface, Spring calls its after- PropertiesSet() method. Similarly, if the bean was declared with an init-method, then the specified initialization method is called. 8 If the bean implements BeanPostProcessor, Spring calls its postProcess-AfterInitialization() method. 9 At this point, the bean is ready to be used by the application and remains in the application context until the application context is destroyed. 10 If the bean implements the DisposableBean interface, Spring calls its destroy() method. Likewise, if the bean was declared with a destroy-method, the specified method is called.
- Spring Boot heavily employs automatic configuration techniques that can elimi¬nate most (and in many cases, all) Spring configuration. It also provides several starter projects to help reduce the size of your Spring project build files, whether you’re using Maven or Gradle.
· Spring began to support Servlet 3.0, including the ability to declare servlets and filters in Java-based configuration instead of web.xml. · You should now have a good idea of what Spring brings to the table. Spring aims to make enterprise Java development easier and to promote loosely coupled code. Vital to this are dependency injection and aspect-oriented programming. When it comes to expressing a bean wiring specification, Spring is incredibly flexible, offering three primary wiring mechanisms: · Explicit configuration in XML · Explicit configuration in Java · Implicit bean discovery and automatic wiring · in many cases, the choice is largely a matter of personal taste, and you’re welcome to choose the approach that feels best for you. Spring attacks automatic wiring from two angles: · Component scanning—Spring automatically discovers beans to be created in the application context. · Autowiring—Spring automatically satisfies bean dependencies. Working together, component scanning and autowiring are a powerful force and can help keep explicit configuration to a minimum.
package soundsystem;
public interface CompactDisc { void play();
}
- The specifics of the CompactDisc interface aren’t important. What is important is that you’ve defined it as an interface. As an interface, it defines the contract through which a CD player can operate on the CD. And it keeps the coupling between any CD player implementation and the CD itself to a minimum.
package soundsystem;
import org.springframework.stereotype.Component;
@Component
public class SgtPeppers implements CompactDisc {
private String title = "Sgt. Pepper's Lonely Hearts Club Band"; private String artist = "The Beatles";
public void play() {
System.out.println("Playing " + title + " by " + artist);
}
}
- that SgtPeppers is annotated with @Component. This simple annotation identifies this class as a component class and serves as a clue to Spring that a bean should be created for the class. Component scanning isn’t turned on by default, however. You’ll still need to write an explicit configuration to tell Spring to seek out classes annotated with @Component and to create beans from them. The configuration class in the following listing shows the minimal configuration to make this possible.
package soundsystem;
import org.springframework.context.annotation.ComponentScan; import org.springframework.context.annotation.Configuration;
@Configuration @ComponentScan
public class CDPlayerConfig {
}
- you can explicitly identify any state as the starting state by setting the start-state attri¬bute in the
element: ```xml <?xml version="1.0" encoding="UTF-8"?>
Welcome to Spizza!!!
</html>
- The _eventId_ portion of the button’s name is a clue to Spring Web Flow that what follows is an event that should be fired. When the form is submitted by clicking that button, a phoneEntered event is fired, triggering a transition to lookupCustomer.

    Flow execution key
```xml
<p>The address is outside of our delivery area. You may
still place the order, but you will need to pick it up
yourself.</p>
<![CDATA[
<a href="${flowExecutionUrl}&_eventId=accept">
Continue, I'll pick up the order</a> |
<a href="${flowExecutionUrl}&_eventId=cancel">Never mind</a>
11>
-
Note that the customerReady end state includes an
-
States, transitions, and entire flows can be secured in Spring Web Flow by using the
element as a child of those elements. For example, to secure access to a view state, you might use like this:
As configured here, access to the view state will be restricted to only users who are granted ROLE_ADMIN access (per the attributes attribute). The attributes attribute takes a comma-separated list of authorities that the user must have to gain access to the state, transition, or flow.
@RequestBody converter
Spring uses HttpMessageConverters to render @ResponseBody (or responses from @RestController).
If a bean you add is of a type that would have been included by default anyway (such as MappingJackson2HttpMessageConverter for JSON conversions), it replaces the default value. A convenience bean of type HttpMessageConverters is provided and is always available if you use the default MVC configuration. It has some useful methods to access the default and user-enhanced message converters (For example, it can be useful if you want to manually inject them into a custom RestTemplate).
On the contrary, REST has little to do with RPC. Whereas RPC is service oriented and focused on actions and verbs, REST is resource oriented, emphasizing the things and nouns that comprise an application.
Put more succinctly, REST is about transferring the state of resources—in a representational form that is most appropriate for the client or server—from a server to a client (or vice versa).
It’s a small start, but you’ll build on this controller throughout this chapter as you learn the ins and outs of Spring’s REST programming model.
Representation is an important facet of REST. It’s how a client and a server communicate about a resource. Any given resource can be represented in virtually any form. If the consumer of the resource prefers JSON, then the resource can be
Meanwhile, a human user viewing the resource in a web browser will likely prefer seeing it in HTML (or possibly PDF, Excel, or some other human-readable form). The resource doesn’t change—only how it’s represented.
Understanding how ContentNegotiatingViewResolverworks involves getting to know the content-negotiation two-step:
-
Determine the requested media type(s).
-
Find the best view for the requested media type(s).
The @ResponseBodyannotation tells Spring that you want to send the returned object as a resource to the client, converted into some representational form that the client can accept. More specifically, DispatcherServletconsiders the request’s Acceptheader and looks for a message converter that can give the client the representation it wants.
Just as @ResponseBody tells Spring to employ a message converter when sending data to a client, the @RequestBody tells Spring to find a message converter to convert a resource representation coming from a client into an object. For example, suppose that you need a way for a client to submit a new Spittle to be saved. You can write the controller method to handle such a request like this:
The body of the POST request is expected to carry a resource representation for a Spittle. Because the Spittleparameter is annotated with @RequestBody, Spring will look at the Content-Type header of the request and try to find a message converter that can convert the request body into a Spittle.
For example, if the client sent the Spittle data in a JSON representation, then the Content-Type header might be set to application/json. In that case, DispatcherServletwill look for a message converter that can convert JSON into Java objects. If the Jackson 2 library is on the classpath, then MappingJackson2Http-MessageConverterwill get the job and will convert the JSON representation into a Spittle that’s passed into the saveSpittle()method. The method is also annotated with @ResponseBodyso that the returned Spittle will be converted into a resource representation to be returned to the client.
Notice that the @RequestMappinghas a consumesattribute set to application/json. The consumesattribute works much like the producesattribute, only with regard to the request’s Content-Typeheader. This tells Spring that this method will only handle POSTrequests to /spittles if the request’s Content-Typeheader is application/json. Otherwise, it will be up to some other method (if a suitable one exists) to handle the request.
The key thing to notice in listing 16.3is what’s not in the code. Neither of the handler methods are annotated with @ResponseBody. But because the controller is annotated with @RestController, the objects returned from those methods will still go through message conversion to produce a resource representation for the client.The @ExceptionHandler annotation can be applied to controller methods to handle specific exceptions. Here, it’s indicating that if a SpittleNotFoundException is thrown from any of the handler methods in the same controller, the spittleNotFound() method should be called to handle that exception.
@ExceptionHandler(SpittleNotFoundException.class)@ResponseStatus(HttpStatus.NOT_FOUND)public @ResponseBody Error spittleNotFound(SpittleNotFoundException e) { long spittleId = e.getSpittleId(); return new Error(4, “Spittle [” + spittleId + “] not found”);}
@ExceptionHandler(SpittleNotFoundException.class) @ResponseStatus(HttpStatus.NOT_FOUND) public @ResponseBody Error spittleNotFound(SpittleNotFoundException e) { long spittleId = e.getSpittleId(); return new Error(4, “Spittle [” + spittleId + “] not found”); }
Because spittleNotFound() always returns an Error, the only reason to keep Response-Entity around is so you can set the status code. But by annotating spittleNotFound() with @ResponseStatus(HttpStatus.NOT_FOUND), you can achieve the same effect and get rid of ResponseEntity.
Again, if the controller class is annotated with @RestController, you can remove the @ResponseBody annotation and clean up the code a little more:
@ExceptionHandler(SpittleNotFoundException.class) @ResponseStatus(HttpStatus.NOT_FOUND) public Error spittleNotFound(SpittleNotFoundException e) { long spittleId = e.getSpittleId(); return new Error(4, “Spittle [” + spittleId + “] not found”); }
public Spittle fetchSpittle(long id) {
RestTemplate rest = new RestTemplate();
ResponseEntity
 "http://localhost:8080/spittr-api/spittles/{id}",
 Spittle.class, id);  if(response.getStatusCode() == HttpStatus.NOT_MODIFIED) {    throw new NotModifiedException();  }  return response.getBody(); }
Just like the getForEntity() method, postForEntity() returns a Response-Entity
By passing in HttpMethod.GET as the HTTP verb, you’re asking exchange() to send a GET request. The third argument is for sending a resource on the request, but because this is a GET request, it can be null. The next argument indicates that you want the response converted into a Spitter object. An
Used this way, the exchange() method is virtually identical to the previously used getForEntity(). But unlike getForEntity()—or getForObject()—exchange() lets you set headers on the request sent. Instead of passing null to exchange(), you pass in an HttpEntity created with the request headers you want.
RESTful architecture uses web standards to integrate applications, keeping the interactions simple and natural. Resources in a system are identified by URLs, manipulated with HTTP methods, and represented in one or more forms suitable for the client.
Spring’s philosophy of avoiding checked exceptions, you don’t want to let the JMSException escape this method, so you’ll catch it instead.
In the catch block, you can use the convertJmsAccessException() method from Spring’s JmsUtils class to convert the checked JMSException to an unchecked JmsException. This is effectively the same thing JmsTemplate does for you in other cases.
A message-listener container is a special bean that watches a JMS destination, waiting for a message to arrive. Once a message arrives, the bean retrieves the message and passes it on to any message listeners that are interested.
JmsInvokerServiceExporter is much like those other service exporters. In fact, note that there’s some symmetry in the names of JmsInvokerServiceExporter and HttpInvokerServiceExporter. If HttpInvokerServiceExporter exports services that communicate over HTTP, then JmsInvokerServiceExporter must export services that converse over JMS.
As it turns out, AMQP offers several advantages over JMS. First, AMQP defines a wire-level protocol for messaging, whereas JMS defines an API specification. JMS’s API specification ensures that all JMS implementations can be used through a common API but doesn’t mandate that messages sent by one JMS implementation can be consumed by a different JMS implementation. AMQP’s wire-level protocol, on the other hand, specifies the format that messages will take when en route between the producer and consumer. Consequently, AMQP is more interoperable than JMS—not only across different AMQP implementations, but also across languages and platforms.
In JMS, there are just three primary participants: the message producer, the message consumer(s), and a channel (either a queue or a topic) to carry the message between producers and consumers. These essentials of the JMS messaging model are illustrated in figures 17.3 and 17.4.
In JMS, the channel helps to decouple the producer from the consumer, but both are still coupled to the channel. A producer publishes messages to a specific queue or topic, and the consumer receives those message from a specific queue or topic. The channel has the double duty of relaying messages and determining how those messages will be routed; queues route using a point-to-point algorithm, and topics route in publish/subscribe fashion.
In contrast, AMQP producers don’t publish directly to a queue. Instead, AMQP introduces a new level of indirection between the producer and any queues that will carry the message: the exchange. This relationship is illustrated in figure 17.8.
Figure 17.8. In AMQP, message producers are decoupled from message queues by an exchange that handles message routing.
For example, to have a message routed to multiple queues with no regard for the routing key, you can configure a fanout exchange and several queues like this:
2024
Lock Wait Timeout Exceptions and Data Persistence Issues in Spring Boot and Hibernate
If you can make your hobby your profession, you never have to work another day in your life. —Anonymous
Why Hibernate Still Logs SQL Even When Disabled in application.yaml
Good leadership consists of doing less and being more. —Dave Ramsey
Streamline Your Workflow by Fastest way to run Maven Builds with a Keyboard Shortcut in IntelliJ
A leader takes people where they want to go. A great leader takes people where they don’t necessarily want to go, but ought to be. —Rosalynn Carter, forme...
使用 c3p0 连接池解决 Spring Boot 中断的数据库连接问题(解决 Spring Boot 中断的数据库连接问题)
一旦你知道答案,一切都会变得简单。” —— 戴夫·梅吉(Dave Magee)
Resolving Disconnected Database Connections in Spring Boot with c3p0 Connection Pool
“Everything is easy, once you know the answer. —Dave Magee
IntelliJ sudden crashed of compile error MapStruct or Kotlin
Life begins at the edge of the comfort zone
Deep dive for word press preview nonce
One must learn by doing the thing; for though you think you know it, you have no certainty, until you try. —Sophocles
你不了解的word press 的 preview nonce
One must learn by doing the thing; for though you think you know it, you have no certainty, until you try. —Sophocles
Notes and pitfalls for redis development
A younger brother knows his older brother better than anyone else.
2023
Awesome Jq For Coders
Mastering JSON Data Manipulation with jq: A Comprehensive Guide
Awesome Xlookup Over Vlookup
XLOOKUP vs. VLOOKUP: Excel’s Dynamic Duo for Data Lookup
Ports Discovery On Hosts
To find out the port numbers running in servers
Troubleshoot Mariadb In Linux
The simplest way to check an mariadb is runnning systemctl status mariadb
Az Cli
To run commands in VMs in Azure
From filter to CNN (Convolutional Network)
The biggest room in the world is the room for improvement. Filters in Convolutional Neural Networks (CNNs) In the context of convolutional neural net...
Unlocking Network Secrets A MacBook Traceroute Tutorial
A younger brother knows his older brother better than anyone else.
How to Test Logging Output in JUnit
A younger brother knows his older brother better than anyone else.
Cheap and flexible computing
whether it seems possible or not - go for it Cheaper X 2 to EC2, to use Fargate Spot With Fargate Spot you can run interruption tolerant Amazon ECS t...
How Guru to use Capturing Groups in Python Regular Expressions
A dream deferred is a dream denied. -Langston Hughes
Composition and Aggregation in Object-Oriented Modeling
“The past does not equal the future unless you live there.” - Tony Robbins
Exploring the useRequest Hook from ahooks
“The best way to predict the future is to invent it.” - Alan Kay
Understanding Python’s Late Binding Behavior A Deep Dive
“Hang Out with People Who are Better than You.” — Warren Buffett
Understanding React export a Component
A young idler, an old beggar. - William Shakespeare Understanding React export a Component In this blog post, we will dive into the code of the RepoU...
why use mid = (low + high) // 2 but not (high-low)//2
“Don’t let yesterday take up too much of today.” - Will Rogers
Introduction to Generator Expressions in Python
“It always seems impossible until it’s done.” - Nelson Mandela
Introduction to Generator Expressions in Python
We never lose friends but just start to find real ones. - William Shakespeare
Understanding Backpropagation in Neural Networks
Your past is a lesson. Not a life sentence. Forgive yourself and focus on the future. -Mel Robbins
Understanding Confusion Matrix in WEKA
Your past is a lesson. Not a life sentence. Forgive yourself and focus on the future. -Mel Robbins
Useful Shortcut Tips for MacBook Office Workers
A young idler, an old beggar. - William Shakespeare
Understanding d-Separation in Graphical Models
A young idler, an old beggar. - William Shakespeare
How To Split Sql Insert Statement
“Don’t let yesterday take up too much of today.” - Will Rogers
docker-commands-bible
“Don’t let yesterday take up too much of today.” - Will Rogers
Weird Problem Changed Configurations In Pom Xml Not Work
“I can’t relate to lazy people. We don’t speak the same language.” — Kobe Bryant
AI Basics, Talk About Searches
“What you seek is seeking you.” — Rumi
Xpath Playground Best Practices
A young idler, an old beggar. - William Shakespeare
UUID deep dive
A young idler, an old beggar. - William Shakespeare
Compile Error Java Kotlin Coexist Project In Intellij
The biggest room in the world is the room for improvement. — Helmut Schmidt
Who Is Running On Port 8080
A young idler, an old beggar. - William Shakespeare
Let AI To Manage Stripe Payment
A young idler, an old beggar. - William Shakespeare
RestTemplate Powered Http2
Why HTTP/2 is Better
Compile Error Java Kotlin Coexist Project In Intellij
How to Fine Tune RestTemplate
how-to-travel-in-cairns
大堡礁的一些知识
Compile Error Java Kotlin Coexist Project In Intellij
The root cause is your customized HttpMessageConverter stopped processing of WebSecurity
io_mockk_MockKException__no_answer_found_for
A young idler, an old beggar. - William Shakespeare
which-port-my-service-is-running
Summary As a Java developer, it’s important to know how to find out which port number your Spring service is running on. This information is useful when you ...
How To Install Sonarqube Via Docker
“Hang Out with People Who are Better than You.” — Warren Buffett
how-to-auto-login-for-citrix-receiver-vpn-client
“Hang Out with People Who are Better than You.” — Warren Buffett
pip-install-behind-proxy
Failure of timeout or connection when running pip install
Elk Search Tips
message:/'Invoking SP with quoteContext*werqewr-1234asdf-sdf23-9d83-asdf23*'/
what is StrictHostKeyChecking in ssh
What’s and how to avoid error of the authenticity of host ‘xxx’ can’t be established You can suppress the “The authenticity of host ‘’ can’t be established” ...
know in and out of free command
You are not a drop in the ocean, you are the entire ocean in a drop.
Chinese Verb
知其雄,守其雌 什么意思
Deep dive for errors during Spring Boot Tests
Transaction silently rolled back because it has been marked as rollback-only
Is Import Star Devil
Why using wildcard import is devil
How To Run Testing Multiple Threading
A sample to test concurrent JPA modifications
Stress Test Concurrency Jpa Entity Random Update
A runnable example in Java to create a cucumber test code files to simulate multiple read and write entity via JPA repository
How To Use Aop Test Utils.jpg
What’s purpose of AopTestUtils.getTargetObject()?
A Brief Introduction To Lookbehind And Lookahead In Regular Expressions
“The only way to do great work is to love what you do.” - Steve Jobs
master-spring-properties-injection
“The only way to do great work is to love what you do.” - Steve Jobs
Transaction Commit In Hibernate Jpa
Give me sample to test concurrent JPA modifications
Spring Boot Test In A Nutshell
what’s spring boot test annotation
How To Detach In Jpa
A real sample of using JPA detach
Feature Flag Spring Boot
summary Feature flag library in spring boot
What’s Difference Of Cny And Cnh
what’s difference of CNY and CNH CNY and CNH are both currencies used in China, but they are different in a few important ways:
Hibernate Transaction Management
Details of how hibernate transaction management works
Spring Cloud Masterpiece 10
In spring cloud what’s when to use feign client and when to sue resttemplate
Spring Cloud Master Piece 9
What’s spring cloud config Spring Cloud Config is a distributed configuration server that provides a centralized location to manage external properties for a...
Spring API Gateway Best Practices
Spring API Gateway Best Practices
Splitting A Monolithic Application Into Microservices
Splitting a monolithic application into microservices can be a complex process that requires careful planning and implementation. Here is a high-level approa...
Spring Cloud Master Piece 6
Sample me build a micro service payment system with spring cloud Here’s an example of building a microservice payment system using Spring Cloud:
Difference Between Using Ribbon And A Load Balancer
The main difference between using Ribbon and a Load Balancer is the location of the load balancing logic.
Spring Cloud Master Piece 5
How to add security among micro service in spring boot
Spring Cloud Master Piece 4
How to use service discovery in spring book
Spring Cloud Master Piece 3
Sample me how to build a eureka service discovery
Spring Cloud Master Piece 2
what’s usage of bootstrap yml In a Spring Boot application, the bootstrap.yml (or bootstrap.properties) file is used for configuring the application’s enviro...
Spring Cloud Master Piece 1
what’s API gateway An API Gateway is a key component in microservices architecture that acts as a single entry point for client requests to a microservices-b...
annoying-debug-logs-in-springboot-test
Stop annoying debug logs in spring boot test
how-to-stop-quartz-scheduling-during-springboot-test
how-to-stop-quartz-scheduling-during-springboot-test
Date Is The Most Ignored Treasure In Macbook
“The only way to do great work is to love what you do.” - Steve Jobs
Mysql Operator To Extract Json
“Believe you can and you’re halfway there.” - Theodore Roosevelt
Master Microfrontends
“The only way to do great work is to love what you do.” - Steve Jobs
How To Convert One Monolith Java System To Microservices
Whatever is worth doing is worth doing well.
How To Config JFR Java Flight Control
“Climb the mountains and get their good tidings. Nature’s peace will flow into you as sunshine flows into trees. The winds will blow their own freshness i...
How To Read Jdk Mission Control Report
Live the life you’ve imagined.
Jdk Mission Control Can Not Start In Macbook M1
“Climb the mountains and get their good tidings. Nature’s peace will flow into you as sunshine flows into trees. The winds will blow their own freshness i...
How To Keep Multiple Copy Paste Value In Macbook
“Winning is nice if you don’t lose your integrity in the process.” — Arnold Horshak
Google マップ内の写真のコメントが表示されない
紹介 私は、私のOppo Androidスマートフォンのアプリ「Googleマップ」で奇妙な問題が発生していることに気づきました。Googleマップで特定の場所(例えば「中央公園」)を検索すると、通常、このアプリは公園の写真やコメントリストを表示するはずです。例えば、誰かが公園の芝生や川の写真を投稿し、便利な場所...
Les commentaires des photos ne s’affichent pas dans Google Maps.
Introduction J’ai remarqué un problème étrange avec l’application “Google Maps” de mon téléphone Android Oppo. Lorsque vous recherchez un lieu sur Google Map...
Is Kerberos One Ssl/tls?
Nothing is as easy as it looks.
How To Save Expect Script Run Output To File Locally
Nothing is as easy as it looks.
Refind Java Concurrency
You are not a drop in the ocean, you are the entire ocean in a drop.
Refind Java Solid Principles
You are not a drop in the ocean, you are the entire ocean in a drop.
How To Extract Table Name From Sql By Python
You are not a drop in the ocean, you are the entire ocean in a drop.
How to find non-empty json value in mysql
You are not a drop in the ocean, you are the entire ocean in a drop.
master-cglib-in-java
You are not a drop in the ocean, you are the entire ocean in a drop.
What is shape function in python pandas
An honest days’ work makes for a good night’s sleep.
What is shape function in python pandas
Imagination is the key ingredient to a happy life.
What is default logic in python try except else
Keep an eye on the fruits of your labor.
Not just use git but know how git symbolic-ref work
Superheros come in all shapes and sizes.
Fix rejection error in Hexo
The heart can see what is invisible to the eye.
Guide to code productively, get more time back for you
The heart can see what is invisible to the eye.
Is Fibonacci sequence that starts with 0 or 1
The best way to predict the future is to create it.
To increase your productivity 10 times, learn expect and read this blog
Som are born beautiful. The rest of us have to work at it.
Treasure Bowl for SQL, helpful for your daily database jobs
Don’t be greedy. Half of something is better than all nothing.
How to fix most permission issues when using Git
The best way to predict the future is to create it.
One killer page to fix most permission issues when using Git
The best way to predict the future is to create it.
How to check your CPU model and Linux distribution in your AWS VM
Lift is short, enjoy the ride.
2022
Magic-in-Micronaut-JPA
The best way to predict the future is to create it.
谷歌地图里面照片的评论和照片在华为手机里面显示不出来
枝上柳棉吹又少, 天涯何处无芳草. –苏轼
Cannot find symbol class Generated or var
The best way to predict the future is to create it.
GraphQL noteworthy points
Life is like the ocean, it goes up and down.
Scripts bible for MySql
Be the Sun of your solar system.
Minium Workable Mvp Vimrc
”—————————————————————- “ 4. User interface “—————————————————————- “ Set X lines to the cursor when moving vertically set scrolloff=0
How to build unit/integration tests for Spring State Machine
Get busy living or get busy dying.
Magic after maven target spring-boot-run
Turn your wounds into wisdom
Bamboo pipeline deployment failure caused by Kubenetes Finalizer
Today a reader, tomorrow a leader.
Gemfire Geode Error on Peer or client version with ordinal xx not supported. Highest known version is 1.12.1 Client
Take the risk or lose the chance!
Password must not null in gemfire and geode, but I’ve assigned password in yaml properties file
Worries less, smile more!
One page to cover most commonly found errors for fat jar in SpringBoot
Kill time, or kiss time!
Awesome Shortcuts to boost productivity
One must learn by doing the thing; for though you think you know it, you have no certainty, until you try. —Sophocles
Core Java tips required an interview
Success is the sum of small efforts, repeated.
Tell me difference of truststore and keystore in short answer
Do what you say, say what you do.
GIT useful scripts or error solutions
Don’t wish for it, work for it.
Tell me difference of yarn install and npm install in short answer
Don’t find fault. Find a remedy.
Bible blog for most commonly found Gradle errors
People are smarter than you think. Give them a chance to prove themselves.
Pearls in Front end development
Be happy in front of people who don’t like you, it kills them.
Ruby from zero to hero
This is your life. Do what you love, and do it often.
Everything you’d know for Groovy interviews
Life is short. Don’t waste it with negative people who don’t appreciate you. Keep them in your heart but keep them out of your life.
To outstanding as professional MacBook pro user
The most effective way to do it, is to do it Homebrew The best practice is to run brew info before install new software. It will generally list what’s c...
Failed to install gem in Mac, incompatible architecture and missing psych
Burn your ego before it burns you.
IntelliJ Tips to boost your productivity 10 times
Don’t be afraid to make s splash.
Everything you’d know about state machine for interviews
Less expecting, more accepting.
Tips about algorithm resolving from Leetcode
Stay focused, believe that you can achieve at the highest level, surround yourself with others who believe in you and do not stray from your goals.
Solution center for Node errors
Fina a way. If there’s none, make one!
Triple your productivities by Visual studio code keyboard shortcuts
The sentence The quick brown fox jumps over the lazy dog uses every letter of the alphabet.
TypeScript noteworthy notes
The moment you start focusing on yourself, things start falling into place.
RXJS – reactive Programming like a hero
When love is real, it doesn’t lie, cheat, pretend or keep secrets.
Concurrency in Java
Little things make big things happens.
Linux Tips
Remember, some things have to end for better things to begin.
A taste of GraphQL
A good day starts with a good mindset!
A taste of GraphQL
A good day starts with a good mindset!
What’s inside magic in Spring Data JPA
A good day starts with a good mindset!
What’s inside magic in Spring Data JPA
A good day starts with a good mindset!
Why Spring turn a column name from camelNaming to snake_Naming
Don’t spend another year doing the same shit.
Some mistakes you’d avoid in java
With great power comes great responsibilities.
Untold stories for Jupiter, any differences JUnit 5 vs Junit 4
Don’t tell people your plans. Just show them your results!
Git commands you can show off for 100 years
Life is short, make a big splash!
FileNotFound Exception when loading data file in IntelliJ
Take time to do what makes your soul happy!
How to ace AWS certification just like play a game
Life isn’t about finding yourself. Life is about creating yourself.
Java Deep Notes
Java Deep Notes
Code to draw a Big H with all stars
Coding is everything! Code Now!
Code to draw a Big H with all stars
Coding is everything! Code Now!
Single vs Double precisions, float vs double data type
Leave nothing for tomorrow which can be done today. -Abraham Lincoln.
SkipTest-Not-Work-In-Multiple-models-project
Leave nothing for tomorrow which can be done today. -Abraham Lincoln.
SkipTest-Not-Work-In-Multiple-models-project
Leave nothing for tomorrow which can be done today. -Abraham Lincoln.
Maven error and solution on No such host is known
Don’t promis when you are hapy. Don’t reply when you’re angry and don’t decide when you’re sad Service keep on restarting If you spot service is restartin...
Maven error and solution on No such host is known
Don’t promis when you are hapy. Don’t reply when you’re angry and don’t decide when you’re sad
Gradle build stuck
Gradle build stuck, keep on running but never ending
2021
Save my eyes, let your cell phone to read screen content to you
Too much screen time
How logging system Bootstrapped in Spring Boot Application
Summary Following diagram demonstrated the process to bootstrap and use Logback for loggings in Spring Boot applciation.
SQLServer Error about This driver is not configured for integrated authentication
Symptoms When you are using integrated authentication (Kerberos connection) for MS SqlServer connection, there is one possible error :
How to copy files from resources folder in jar and save to a file
Why to extract resources from jar to local disk
Debug of SpringBoot run not working in IntelliJ
Normal approach to debug maven
How to watch specific kubenetes deployment by labels
How to watch specific kubenetes deployment by labels
Failed to talk to github.com from corporation network
Background It’s typical to get various network connection issues when you run commands within corporation network. For example, you’ll find diversed issues w...
Day-Day-Up-Java
More developer friendly Threa Sleep
How to user fire extinguisher
Summary As you know, staff and your safety is paramount. So what if emergency take place, such as fire in office, how to help yourself and your colleagues by...
Deep dive into ApplicationEvent in SpringBoot
Summary As you know, there are various event will be sent (multicast) when a specific story taken place.
2021-09-22-IT-Solutions-For-Remote-Learning
IT-Solutions-For-Remote-Learning.md
Deep dive into Kubernetes Client API
Summary To talk to K8s for getting data, there are few approaches. While K8s’ official Java library is the most widely used one. This blog will look into thi...
How to get CPU name, core, 64bit and speed in command line
Summary In windows operating system, if you want to get your CPU name, core, 64bit and speed in command line. Just follow below actions:
JetBrains/IntelliJ tips
Be a good person in real life, not in social media
Whitelabel Error Page
Summary Whitelabel Error Page is the default error page in Spring Boot web app. It provide a more user-friently error page whenever there are any issues when...
Google maps no photos reviews
Summary
谷歌地图里面照片的评论显示不出来
If you’d like to view solution in YouTube, check out at https://youtu.be/ICiwuqJ-yU8
Shall I still need booster even after I got dose 3?
The greatest wealth is health!
Debts in a nutshell
A debt security represents a debt owed by the issuer to an investor. Here, the investor acts as a lender to the issuer which may be a government, organisatio...
2020
How to process data from S3 download URL
S3 download URL As you know, AWS S3 object can be downloaded/processed by S3 download URL. I’m showing you two examples on how to process S3 Object by NIO f...
Debug Stuck IntelliJ
What happened to a debug job hanging in IntelliJ (IDEAS) IDE? You may find when you try to debug a class in Intellij but it stuck there and never proceed, e....
Awesome Kotlin
Difference with Scala Kotlin takes the best of Java and Scala, the response times are similar as working with Java natively, which is a considerable advantag...
Awesome tips for Chrome
Shortcuts & tips
JVM热身
此文是作者英文原文的翻译文章,英文原文在:http://todzhang.com/posts/2018-06-10-jvm-warm-up/
Awesome tips and shortcuts for Slack
Shortcuts for Slack
Awesome Reactive programming
Key points of Reactive Programming
Awesome Swift for iOS
Frame in Swift
Mock in kotlin
Argument Matching & Answers For example, you have mocked DOC with call(arg: Int): Intfunction. You want to return 1 if argument is greater than 5 and -1 ...
Mock in kotlin
Argument Matching & Answers For example, you have mocked DOC with call(arg: Int): Intfunction. You want to return 1 if argument is greater than 5 and -1 ...
Docker
Dockers Concepts
How to decode path parameters in All REST WebServices calls
How to decode path parameters in All REST WebServices calls
Curl
Linux Curl command
AOP
The concept of join points as matched by pointcut expressions is central to AOP, and Spring uses the AspectJ pointcut expression language by default.
Micrometer notes
As a general rule it should be possible to use the name as a pivot. Dimensions allow a particular named metric to be sliced to drill down and reason about th...
Pigeons in holes principle
# Pigeonhole principle
Awesome solutions for algorithm questions
你就会发现只要涉及递归的问题,都是 树的问题。
A Facial Recognition utility in a dozen of LOC
A Facial Recognition utility in a dozen of python LOC (Lines Of Code)
Awesome SSL certificates and HTTPS
What’s TLS TLS (Transport Layer Security) and its predecessor, SSL (Secure Sockets Layer), are security protocols designed to secure the communication betwee...
JVM warm up by Escape Analysis
Why JVM need warm up I don’t know how and why you get to this blog. But I know the key words in your mind are “warm” for JVM. As the name “warm up” suggested...
Java Concurrent Column 2
This is the second half about Java Concurrent of my blog
Java Concurrent
This blog is about noteworthy pivot points about Java Concurrent Framework Back to Java old days there were wait()/notify() which is error prone, while fr...
Algorithm notes from Leecode – 1
Algorithm Leetcode
2019
Conversations with God
Feelings is the language of the soul. If you want to know what’s true for you about something, look to how your’re feeling about.
Kafka In Spring
Enable Kafka listener annotated endpoints that are created under the covers by a AbstractListenerContainerFactory. To be used on Configuration classes as fol...
Terraform
Why Terraform
Kafka
Kafka
Mifid
FX Spot is not covered by the regulation, as it is not considered to be a financial instrument by ESMA, the European Union (EU) regulator. As FX is considere...
Foreign Exchange
currency pairs Direct ccy: means USD is part of currency pair Cross ccy: means ccy wihtout USD, so except NDF, the deal will be split to legs, both with...
2018
Seconds
nano seconds
Citrix receiver
Simple Binary Encoding (SBE)
Citrix receiver
“Cannot connect to remote desktop” with Citrix Receiver
Guice
A new type of Juice Put simply, Guice alleviates the need for factories and the use of new in your Java code. Think of Guice’s @Inject as the new new. You wi...
YAML
Key points All YAML files (regardless of their association with Ansible or not) can optionally begin with — and end with …. This is part of the YAML format a...
Distruptor
multithreading
Mockito
Feature
Protobuf
What are protocol buffers?
Sudo in a Nutshell
Sudo in a Nutshell Sudo (su “do”) allows a system administrator to give certain users (or groups of users) the ability to run some (or all) commands as root...
Zoo-keeper
ZK Motto the motto “ZooKeeper: Because Coordinating Distributed Systems is a Zoo.”
Presto DB
WHAT IS PRESTO?
Chronicle
Overview
Cucumber
Acceptance testing vs unit test It’s sometimes said that unit tests ensure you build the thing right, whereas acceptance tests ensure you build the right thi...
Scala
Scala String
akka framework of scala
philosophy The actor model adopts the philosophy that everything is an actor. This is similar to the everything is an object philosophy used by some object-o...
File Util in Apache Camel
FileUtil.class
Apache Camel
Camel’s message model In Camel, there are two abstractions for modeling messages, both of which we’ll cover in this section. org.apache.camel.Message—The ...
QuickFixJ
Settings
JXM
Exporting your beans to JMX The core class in Spring’s JMX framework is the MBeanExporter. This class is responsible for taking your Spring beans and registe...
Solace MQ
Solace PubSub+ It is a message broker that lets you establish event-driven interactions between applications and microservices across hybrid cloud environmen...
Apigee
App deployment, configuration management and orchestration - all from one system. Ansible is powerful IT automation that you can learn quickly.
Ansible
Ansible: What Is It Good For? Ansible is often described as a configuration management tool, and is typically mentioned in the same breath as Chef, Puppet, a...
flexbox
How Flexbox works — explained with big, colorful, animated gifs
Jboss tips
commands:
Locking and multithreading
Single Writer principle
KDB
KDB However kdb+ evaluates expressions right-to-left. There are no precedence rules. The reason commonly given for this behaviour is that it is a much simple...
Foreign Exchange
Foreign Exchange markets
Portactor
Better to use smart wait
Agile and SCRUM
Key concept In Scrum, a team is cross functional, meaning everyone is needed to take a feature from idea to implementation.
DevOps-Philosophy
:100:DevOps Model Defined
rxjs pipe in depth
https://stormforger.com/blog/2016/07/08/types-of-performance-testing/
How to setup nodejs to install package from intranet
Error of ‘ECONNRESET’ You may face error ECONNRESET from intranet, even appropriate proxy tools (e.g. cntlm) is running. The errors may looks like ```bash $ ...
Strategy-Of-Openshift-Releases
Release & Testing Strategy There are various methods for safely releasing changes to Production. Each team must select what is appropriate for their own ...
NodeJs Notes
commands to read files var lineReader = require(‘readline’).createInterface({ input: require(‘fs’).createReadStream(‘C:\dev\node\input\git_reset_files.tx...
Minium Viable Product
https://blog.leanstack.com/minimum-viable-product-mvp-7e280b0b9418
What is difference between declarations, providers and import in NgModule
What is difference between declarations, providers and import in NgModule
CORS :Cross-Origin Resource Sharing
Cross-Origin Request Sharing - CORS (A.K.A. Cross-Domain AJAX request) is an issue that most web developers might encounter, according to Same-Origin-Policy,...
ngrx
Why @Effects? In a simple ngrx/store project without ngrx/effects there is really no good place to put your async calls. Suppose a user clicks on a button or...
iOS programming
View A view is also a responder (UIView is a subclass of UIResponder). This means that a view is subject to user interactions, such as taps and swipes. Thus,...
2017
cloud computering
openshift vs openstack The shoft and direct answer is `OpenShift Origin can run on top of OpenStack. They are complementary projects that work well together....
cloud computering
Concepts Cloud computing is the on-demand demand delivery of compute database storage applications and other IT resources through a cloud services platform v...
Redux
whats @Effects You can almost think of your Effects as special kinds of reducer functions that are meant to be a place for you to put your async calls in suc...
reactive programing
The second advantage to a lazy subscription is that the observable doesn’t hold onto data by default. In the previous example, each event generated by the in...
common errors in NPM or node
code E503 code E503 when run npm install packages, e.g.
Container
The Docker project was responsible for popularizing container development in Linux systems. The original project defined a command and service (both named do...
promise vs observiable
The drawback of using Promises is that they’re unable to handle data sources that produce more than one value, like mouse movements or sequences of bytes in ...
Openshift tips
Commands bible
google analysis
How Page Value is calculated
JDK source
interface RandomAccess Marker interface used by List implementations to indicate that they support fast (generally constant time) random access. The primary ...
SSH SFTP
Secure FTP SFTP over FTP is the equivalant of HTTPS over HTTP, the security version
Setup WebSphere profiles and application in command line
Setup WebSphere profiles and application in command line
AWS Tips
After establishing a SSH session, you can install a default web server by executing sudo yum install httpd -y. To start the web server, type sudo service htt...
Oracle
ORA-12899: Value Too Large for Column
Spring notes
Spring Bean Life Cycle Callback Methods
Kindle notes
#《亿级流量网站架构核心技术》目录一览 TCP四层负载均衡 使用Hystrix实现隔离 基于Servlet3实现请求隔离 限流算法 令牌桶算法 漏桶算法 分布式限流 redis+lua实现 Nginx+Lua实现 使用sharding-jdbc分库分表 Disruptor+Redis...
Java JIT compiler
This is talking about Java JIT (Just-In-Time) compiler
Java Security Notes
Java Security well-behaved: programs should be prevent from consuming too much system resources
SeriableVersionUID
Noteworthy points about SeriableVersionUID in Java
R Language
s<-read.csv("C:/Users/xxx/dev/R/IRS/SHH_SCHISHG.csv") # aggregate s2<-table(s$Original.CP) s3<-as.data.frame(s2) # extract by Frequency ordered s3...
SSH and Cryptography
SFTP versus FTPS SS: Secure Shell An increasing number of our customers are looking to move away from standard FTP for transferring data, so we are ofte...
Eclipse notes
How do I remove a plug-in? Run Help > About Eclipse > Installation Details, select the software you no longer want and click Uninstall. (On Macintosh i...
Java JVM
Class loading subsystem
Maven-Notes
Maven philosophy “It is important to note that in the pom.xml file you specify the what and not the how. The pom.xml file can also serve as a documentatio...
Java New IO
Notes JDK 1.0 introduced rudimentary I/O facilities for accessing the file system (to create a directory, remove a file, or perform another task), accessi...
Network Protocols
Net Protocols
IT-Architect
SOA SOA is a set of design principles for building a suite of interoperable, flexible and reusable services based architecture. top-down and bottom-up a...
Algorithm
This page is about key points about Algorithm
Dead Lock
Concept
Java-Tricky-Tech-Questions.md
What is the difference between Serializable and Externalizable in Java? In earlier version of Java, reflection was very slow, and so serializaing large ob...
NavigableMap Misc
What is NavigableMap
Compare-In-Java
Concepts If you implement Comparable interface and override compareTo() method it must be consistent with equals() method i.e. for equal object by equals(...
Java Collections Misc
Difference between equals and deepEquals of Arrays in Java Arrays.equals() method does not compare recursively if an array contains another array on oth...
HashMap in JDK
Hashmap in JDK Some note worth points about hashmap Lookup process Step# 1: Quickly determine the bucket number in which this element may resid...
Java 8 Tips
This blog is listing key new features introduced in Java 8
Arbitrage vs Heading
What is the difference between arbitrage and hedging?
Java Enum Misc
Enum Misc
2016
Java GC notes
verbose:gc verbose:gc prints right after each gc collection and prints details about each generation memory details. Here is blog on how to read verbose gc
Hash Code Misc
contract of hashCode : Whenever it is invoked on the same object more than once during an execution of a Java application, the hashCode method must consis...
Apache Tips
Apache
Angulary Misc
Dependency Injection Angular doesn’t automatically know how you want to create instances of your services or the injector to create your service. You must co...
Random number in java
ThreadLocalRandom, SecureRandm, java.util.Random, java.math.Random
Java new features
JDK Versions JDK 1.5 in 2005 JDK 1.6 in 2006 JDK 1.7 in 2011 JDK 1.8 in 2014 Sun之前风光无限,但是在2010年1月27号被Oracle收购。 在被Oracle收购后对外承诺要回到每2年一个realse的节奏。但是20...
用10几行代码自己写个人脸识别程序
用10几行代码自己写个人脸识别程序
Eslastic Search
Eslastic Search
JSON lines
JSON lines
Python Scraphy
Python Scraphy
Simpler chronicle of CI(Continuous Integration) “乱弹系列”之持续集成工具
引言 有句话说有人的地方就有江湖,同样,有江湖的地方就有恩怨。在软件行业历史长河(虽然相对于其他行业来说,软件行业的历史实在太短了,但是确是充满了智慧的碰撞也是十分的精彩)中有一些恩怨情愁,分分合合的小故事,比如类似的有,从一套代码发展出来后面由于合同到期就分道扬镳,然后各自发展成独门产品的Sybase DB和微...
Head First Blockchina 3
Hyperledger Fabric for Mortals
【原创】深入浅出区块链系统:第二章
使用Solidity创建以太坊(Ethereum)智能合约(Smart Contract)
How to customize Sublime syntax highlights
Reference Sublime Scope Naming Syntax Guide
浅谈软件单元测试中的“断言” (assert),从石器时代进步到黄金时代。
大家都知道,在软件测试特别是在单元测试时,必用的一个功能就是“断言”(Assert),可能有些人觉得不就一个Assert语句,没啥花头,也有很多人用起来也是懵懵懂懂,认为只要是Assert开头的方法,拿过来就用。一个偶然的机会跟人聊到此功能,觉得还是有必要在此整理一下如何使用以及对“断言”的理解。希望可以帮助大家...
Head First Blockchina 1
深入浅出区块链系统:第一章. what you should know about blockchain
Kubernetes 与 Docker Swarm的对比
Kubernetes 和Docker Swarm 可能是使用最广泛的工具,用于在集群环境中部署容器。但是这两个工具还是有很大的差别。
漫谈开发设计中的一些‘原则’及’设计哲学’
在开发设计中有一些常用原则或者潜规则,根据笔者的经验,这里稍微总结一下最最常用的,以飨读者。
http methods
RFC origion http://www.w3.org/Protocols/rfc2616/rfc2616-sec9.html#sec9.1.2)
Spark-vs-Storm
The stark difference among Spark and Storm. Although both are claimed to process the streaming data in real time. But Spark processes it as micro-batches; wh...
微服务
可以想像一下,之前的传统应用系统,像是一个大办公室里面,有各个部门,销售部,采购部,财务部。办一件事情效率比较高。但是也有一些弊端,首先,各部门都在一个房间里。
unmodifiableList, unmodifiableSet,unmodifiableMap
What’s it Returns an unmodifiable view of the specified set. This method allows modules to provide users with “read-only” access to internal sets. Query ope...
kibana, view layer of elasticsearch
What’s Kibana kibana is an open source data visualization plugin for Elasticsearch. It provides visualization capabilities on top of the content indexed on...
kibana, view layer of elasticsearch
What’s Kibana kibana is an open source data visualization plugin for Elasticsearch. It provides visualization capabilities on top of the content indexed on...
Anatomy of ThreadLocal
Design philosophies
iConnect
UI HTML5, AngularJS, BootStrap, REST API, JSON Backend Hadoop core (HDFS), Hive, HBase, MapReduce, Oozie, Pig, Solr
Business Analysis
Purpose of BA 带来一些商业价值(收益) 解决业务痛点
Something about RESTful architect
REST API must be hypertext driver Roy’s interview
Data Structure
Binary Tree A binary tree is a tree in which no node can have more than two children. A property of a binary tree that is sometimes important is that th...
Useful bookmarks
eBooks list of various books Node.js
heavy load web application
Common solutions
tips in as400 IBM Emulator
Toggle crosshair
Mysql operator to extract JSON
“Be the change you wish to see in the world.” - Mahatma Gandhi
equity trading
Difference between mutal funds and hedge funds
SQL
Differences between not in, not exists , and left join with null
HTTPS/2
concepts
Github page commands notes
404 error for customized domain (such as godday) 404 There is not a GitHub Pages site here. Go to github master branch for gitpages site, manually add CN...
RenMinBi International
RQFII RQFII stands for Renminbi Qualified Foreign Institutional Investor. RQFII was introduced in 2011 to allow qualified foreign institutional investors to ...
JavaScript tips
includes() vs some()
Docker Errors and Fixes
Docker Errors
Load Balancing
Concepts LVS means Linux Virtual Server, which is one Linux built-in component.
Python
(‘—–Unexpected error:’, <type ‘exceptions.TypeError’>) datetime.datetime.now()
Storage Management
RAID RAID is Reductant Array Independent Disk,
CI and CD
Concepts
XA Transactions in 2PC
Description
Setup Git in Mint Linux
How to setup Git in Mint Linux =================================================
Database sharding
DB sharding in YHD
Microservices vs. SOA
Microservice Services are organized around capabilities, e.g., user interface front-end, recommendation, logistics, billing, etc. Services are small in ...
Java Class Loader
Codecache The maximum size of the code cache is set via the -XX:ReservedCodeCacheSize=N flag (where N is the default just mentioned for the particular com...